
Focus Group Quick Overview
Bringing 6–12 participants together for a 60–90 minute guided chat uncovers rich feedback and refines product ideas on the spot. Before you lock in venues and recruit, here’s a straightforward framework to guide your planning.
Core Steps
- Pinpoint objectives that tie directly to your research goals.
- Recruit selectively using purposive sampling to target your ideal users.
- Draft a discussion guide with open-ended prompts and probing follow-ups.
- Steer the conversation so neither the talkative nor the quiet dominate.
- Turn raw feedback into clear, actionable takeaways for your product team.
Imagine a design squad running two 90-minute sessions with eight users each. As participants explore a new app feature, the team watches in real time, notes stumbling blocks and “aha” moments, and adjusts questions mid-stream. That’s how objectives, recruitment, moderation and analysis come together naturally.
Focus Group Key Parameters
Below is a quick reference for the most common focus group setup. Use it to align expectations across your team.
| Participants | Duration | Groups per Segment |
|---|---|---|
| 6–12 | 60–90 min | 2 |
This table keeps your planning on track and ensures you’re neither under- nor over-allocating resources.
Real-World Application
An e-commerce team spotted a confusing checkout step and nipped a costly overhaul in the bud—saving an estimated $50,000 and several weeks of development. They broke a 90-minute session into three concise phases:
- Icebreaker and rapport-building (10 minutes)
- In-depth discussion on checkout flow (40 minutes)
- Final thoughts and quick survey (10 minutes)
Each segment guides participants smoothly, so you capture fresh reactions without fatigue.
For broader context, check out Exploding Topics and their insights on market research stats.

This data illustrates why the 60–90 minute format strikes the right balance—deep enough to explore ideas, short enough to keep everyone engaged.
Learn more about handling participant nerves and group dynamics in our article on evaluation apprehension.
Key Takeaway
A well-structured focus group gives you in-depth insights without wearing out your participants. Use this quick checklist to steer your next session toward meaningful discoveries.
Planning Focus Group Logistics
Laying out a detailed roadmap transforms your objectives into a smooth, well-coordinated session. Decide early whether you’ll meet face-to-face or online based on how comfortable your participants are with tech and how far they’re spread across locations. Engaging stakeholders right away also builds the support you need—from room bookings to note-takers.

Selecting The Right Format
In-person gatherings spark natural chemistry when people share the same space. You catch those nonverbal cues—smiles, frowns, shifting postures—without effort.
On the other hand, virtual sessions let you tap into a wider pool of participants, shaving off travel time and budget. Screen sharing and built-in recording features make capturing insights effortless.
- In-Person Pros: Read body language and foster instant rapport.
- Virtual Pros: Expand your reach and capture high-quality recordings.
- Audience Fit: Survey tech access and comfort to guide your choice.
A quick dry run—whether around a conference table or over Zoom—will flag any glitches before the real session.
Scouting Ideal Venues
Neutral territory encourages open dialogue. Look for spots with flexible seating so you can switch from whole-group to smaller breakouts without a hitch.
| Criteria | Why It Matters | Example Option |
|---|---|---|
| Seating Flexibility | Encourages small-group chats | Adjustable chairs around a table |
| Sound Privacy | Prevents unwanted background noise | Private conference room |
| Tech Setup | Supports recording and presentations | Built-in speakers & Wi-Fi |
| Accessibility | Ensures participants arrive without hassle | Ground-floor venue |
Walk through each site in person. You’ll discover quirks—echoes, poor signage or dead Wi-Fi spots—that don’t show up online. Nail down room bookings and any extra fees with a signed agreement.
Creating Session Timeline
A clear agenda keeps everyone on the same page. Slot time for intros, deep dives, breaks, and wrap-up with just enough breathing room.
- 10 minutes: Welcome remarks and an icebreaker to break the ice.
- 40 minutes: Core discussion with open-ended probes.
- 10 minutes: Short break plus quick tech check.
- 25 minutes: Final conversation and feedback prompts.
- 5 minutes: Close-out and overview of next steps.
Share a visual timer or calendar invite so participants always know what’s coming.
Building Contingency Plans
Even the best-laid plans hit snags. Recruit backup participants in advance—they can join if someone drops out last minute. Test internet speeds ahead of time and have spare devices at the ready.
A solid backup plan keeps the conversation flowing, no matter what surprises pop up.
Let participants know how you’ll handle hiccups. A quick note in your session invite goes a long way toward setting expectations.
Estimating Budget And Equipment
Outline every line item to prevent surprises down the road. That means tallying:
- Venue rental (hourly or daily rates)
- Participant incentives that align with local norms and ethics
- Tech gear: lapel mics, cameras, screen-recording software
- Snacks, printed handouts, and a contingency fund
Secure recording tools and test them well before day one. Check out our workshop planning template for a turnkey checklist.
Track all expenses in a shared spreadsheet to keep everyone in the loop.
- Pin down your research questions and expected deliverables.
- Decide on a face-to-face or online setting by checking participants’ tech habits and geography.
- Book a location that offers comfortable seating, sound privacy, and reliable tech.
- Lay out your agenda minute by minute, weaving in rest breaks and closing prompts.
- Budget for venue costs, participant rewards, snacks, travel, and recording gear.
- Have contingency plans for late joiners and connection hiccups.
A clear logistics map frees you to dive into the conversation and harvest actionable insights.
Coordinating With Stakeholders
Get product managers, observers, and note-takers on the same page well before kickoff. Set up regular check-ins to go over timelines, budget updates, and recruitment progress.
- Appoint a tech lead to manage platforms and troubleshoot.
- Highlight decision points and their sign-off deadlines.
- Store session guides and templates in a shared cloud folder.
- Agree on reporting deadlines so findings feed into the next planning cycle.
Real-World Venue Scenario
A startup once reserved a coworking space only to discover the projector didn’t pair with their laptops. Within minutes, they pivoted to a smart TV and cut the delay down to 15 minutes—no sweat.
Final Logistics Review
About 48 hours before your session, run through every contract, license, and equipment booking. Send participants a detailed agenda and access instructions a full day in advance. Confirm backup contacts for venue staff and IT support in case you need them.
- Verify the seating layout matches your group size and discussion style.
- Test every microphone, camera, and screen share setup.
- Re-confirm RSVPs and send friendly reminders.
- Ensure consent forms and note-taking templates are ready to go.
With these logistics locked in, you’ll head into your focus group confident, calm, and ready to capture meaningful insights.
Recruiting Participants and Managing Ethics
Everything rests on who you bring into the room. If your screener survey isn’t tight, the insights won’t stand up. A good screener pares down candidates with simple yes/no filters, making sure you’re talking to the right people from the start.
- Define target age range, location, and usage frequency.
- Exclude conflicting backgrounds to cut out noise.
- Pilot your screener with a handful of people to spot unclear wording.
Quotas keep one group from taking over. When we ran a snack brand study, we needed 10 participants in two weeks. Clear quotas stopped any single segment from dominating and sped up recruitment.
Setting Demographic Quotas
Quotas act as guideposts, ensuring every key segment gets heard. Here’s how we laid ours out:
| Demographic | Quota | Notes |
|---|---|---|
| Age 18–25 | 4 participants | Young snack-lovers mix |
| Age 26–40 | 4 participants | Core user segment |
| Dietary restrictions | 2 participants | Gluten-free or vegan options |
Flexibility is crucial. No-shows happen—keep a few standbys ready to jump in.
Choosing Fair Incentives
The right incentive boosts turnout without skewing opinions. Think gift cards, cash stipends, or vouchers sized to local norms.
- Spell out reward amounts in your invitation and consent form.
- Offer a few options to suit different preferences.
- Deliver incentives promptly to build trust.
“Informed consent and confidentiality are non-negotiable. Protecting participant rights builds trust and credibility.”
Consent forms should cover the study’s purpose, data usage, and privacy measures. Make sure participants know they can withdraw at any time with no penalty.
Diversity ignites fresh ideas. To explore varied mindsets, dive deeper into cognitive diversity in research.
Ensuring Diversity And Confidentiality
Handling data responsibly is the backbone of ethical research. We anonymize transcripts, secure recordings, and restrict access to a small, trusted team.
- Send signed consent forms via secure channels.
- Confirm your roster meets all quota targets.
- Brief participants on privacy protocols and the use of anonymized quotes.
Run a short tech check before remote sessions to avoid delays:
- Verify internet speed for online attendees.
- Check device compatibility with stimulus materials.
- Provide simple troubleshooting tips.
Plan recruitment at least two weeks ahead, building in buffer days for holiday schedules and last-minute dropouts. Schedule reminders 24 hours and 2 hours before each session and keep 2–3 extras on standby.
After each focus group, debrief with your team to refine the process. Then send participants a brief summary of key insights—it’s a small gesture that shows you value their time and builds goodwill for future studies.
Final Note: Targeted screening, balanced quotas, and rigorous ethics create reliable insights you can trust. Keep participant rights front and center, and you’ll set the stage for success.
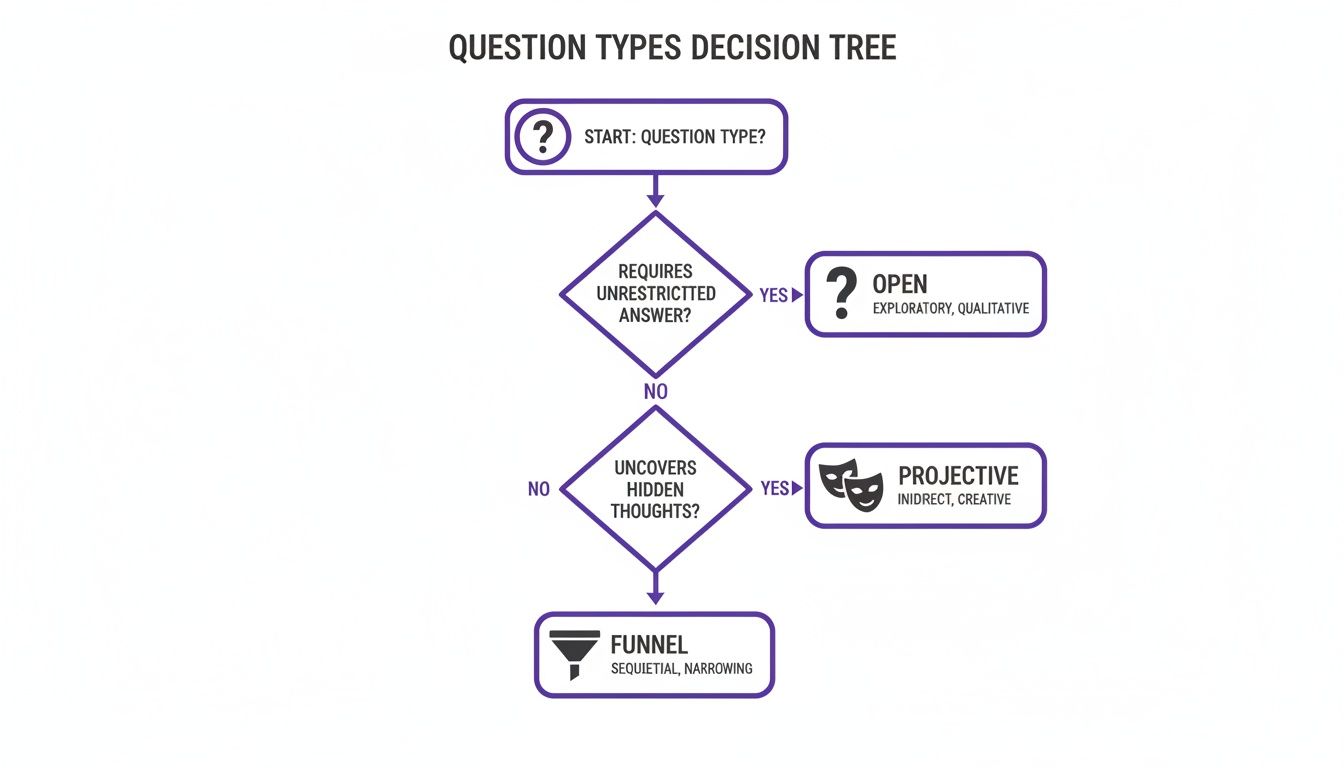
Crafting Effective Questions And Moderator Guides
Every focus group stands or falls on the questions you prepare and the script you follow. Thoughtful prompts spark genuine reactions without steering opinions. To get the richest insights, blend open-ended, projective, and funnel questions in the same session.
- Open-Ended Queries invite personal stories rather than simple yes/no replies.
- Projective Methods have participants project feelings onto images or scenarios.
- Funnel Techniques start broad, then narrow in on the specifics you want to confirm.
Switching among these three keeps energy high and discussion fresh.
Sequencing Questions For Maximum Insight
A smooth flow helps participants build on each other’s ideas. Begin with warm-ups, then dive into core themes.
- Icebreakers: Simple introductions or quick polls to set a relaxed tone.
- First Impressions: Broad probes on what they like or dislike about your interface.
- Task Walkthroughs: Ask participants to narrate step-by-step how they’d tackle a key workflow.
- Unmet Needs Exploration: Encourage them to describe features they wish existed.
- Value Prioritization: Have the group rank features by importance.
- Future Scenarios: Pose hypothetical use cases and gather reactions.
Always follow each section with at least two quick probes to uncover underlying motivations.
Real Moderator Script Example
Here’s a snippet from a 90-minute B2B software study. Notice how clear time slots guide pacing.
| Time | Activity | Script |
|---|---|---|
| 0–10 min | Icebreaker | “Introduce yourself and one favorite feature of our software.” |
| 10–30 min | Impressions | “Walk me through your first reaction to the dashboard.” |
| 30–60 min | Task Walkthrough | “Show how you complete a common task step by step.” |
| 60–80 min | Needs Probe | “What’s missing to make this experience smoother?” |
| 80–90 min | Wrap Up | “Any final thoughts or suggestions for improvement?” |
Key Insight Balanced pacing and clear prompts keep participants focused and energized.
Pilot Testing Tips
A pilot session acts like a dress rehearsal, highlighting awkward phrasing and timing gaps.
- Record your pilot and note moments of dead air or confusion.
- Watch participant reactions to spot misinterpretations.
- Tweak language until prompts feel conversational.
- Compare your time estimates against real answers, then adjust topic durations.
Learn more about open-ended questions in research to refine your prompts. With a polished guide, moderators enter each session confident and clear—meaning richer data and smoother conversations.
Icebreaker Ideas
A strong icebreaker in the first 5–10 minutes sets a collaborative tone.
- Two Truths and a Challenge: Share two wins and one pain point with the product.
- Feature Bingo: Use a custom card listing common tasks to spark quick insights.
- Quick Vote: Show screenshots and have participants pick the best layout, then explain why.
Sequencing Follow Ups
Good follow-ups dig deeper once core topics land. Try asking:
- “Why did you choose that option, and what alternatives did you consider?”
- “How does this feature compare to others you’ve used?”
- “What emotions came up when you saw this label or icon?”
Reading your own script aloud can reveal confusing phrasing before you ever meet participants.
Building Confidence Before Live Sessions
A confident moderator makes everyone else feel at ease. Role-play with colleagues to refine pacing and neutrality.
- Practice neutral phrasing—avoid leading words or judgments.
- Time your prompts so they neither rush nor cut off rich details.
- Keep a simple checklist of key probes and reminders to maintain flow.
Combining Guides With Digital Tools
Digital platforms like Bulby can host your discussion guides, timestamp questions, and prompt reminders automatically.
- Automated Reminders ensure no topic gets skipped during live sessions.
- Live Editing lets you adjust questions on the fly when energy dips.
- Data Integration exports responses directly for analysis—no manual transcription required.
Pairing a solid guide with Bulby’s structured environment transforms moderators into confident facilitators. That synergy elevates every step—from planning through reporting—into a seamless, insight-driven process.
Running Focus Group Sessions In-Person And Online
A focus group’s success hinges on setting the right tone—whether you’re in a conference room or dialing in online. Every detail, from seating to tech support, shapes how freely people share their thoughts.
In a boardroom, arrange chairs in a circle to boost eye contact and invite everyone to speak. When you go virtual, bring in a co-host to tackle tech bumps and jot notes, so the main moderator stays fully present.
That graph shows how online sessions outpaced in-person research, with online focus groups hitting over 85% usage by the mid-2020s.
By that time, 84–90% of qualitative studies were moving online—slashing venue fees and opening doors to global participants. For a deeper look at these trends, visit FocusFWD.
- Group Dynamics: Face-to-face meetups let you read nonverbal cues.
- Virtual Comfort: People unwind in their own space.
- Response Pace: Online discussions often follow a tighter rhythm.
- Tech Tools: Built-in recordings and chat logs make analysis smoother.
Essentials Of In-Person Setup
Capturing subtle reactions means clear sound and flattering light. Aim spotlights behind the camera so faces stay bright, not shadowed.
Seating is equally crucial. Position chairs so everyone can see each other without twisting—this simple tweak keeps distractions low.
- Lighting: Back the lights off-axis to avoid harsh glare.
- Audio: Lapel mics or boundary mics pick up every nuance.
- Seating: Use swivel chairs that shift easily for breakout chats.
Virtual Focus Group Tools
Breakout rooms mimic hallway conversations by splitting participants into smaller clusters. It’s a quick way to spark more candid exchange.
Screen sharing lets you roll out stimulus materials on the fly, while polls and reactions lock in attention. And always record locally as a safety net.
- Zoom (https://zoom.us) for its flexible breakout features.
- Microsoft Teams (https://www.microsoft.com/en/microsoft-teams/group-chat-software) to tie in documents seamlessly.
- Webex (https://www.webex.com) when you need robust security and polling options.
- Stimulus Sharing: Upload videos or images for real-time feedback.
- Recording Backup: Save both cloud and local copies to prevent data loss.
Below is a quick comparison of the two approaches:
Let’s lay out how these two approaches differ at a glance.
| Aspect | In-Person | Online |
|---|---|---|
| Tech Setup | Cameras and mics tested on site | Ensure stable Wi-Fi and backups |
| Participant Flow | Physical handouts and stimuli | Digital file sharing |
| Engagement | Face-to-face rapport | Use polls and reactions |
This comparison should help you decide which route fits your next project best.
Active Listening And Probing
True listening is more than hearing words—it’s nods, reflections, and tactful follow-ups. A simple, “Can you tell me more?” often unearths the richest insights.
When one person dominates, invite others in: “What’s your take on this?” That gentle nudge balances the conversation.
"A well-timed neutral probe can reveal hidden motivations and deeper emotions."
Backup Strategies And Contingency Plans
Even the most polished session can hit a snag. Test your internet speed 24 hours before, then have a mobile hotspot standing by.
Pack spare mics, cables and cameras in case something fails, and share a secondary meeting link upfront.
- Extra Equipment: Lapel mics, adapters and power banks.
- Alternative Link: A fallback URL ready in your invite.
- Phone Dial-In: Let participants call in if video stutters.
- Recording Redundancy: Record to both cloud and local drives.
Real-World Remote Session Example
I once ran an online focus group across four time zones for a product team. We pre-tested USB mics, set up a shared digital whiteboard and outlined roles clearly.
Our co-host monitored the chat, flagged mute mishaps and took notes. When someone’s video dropped, we switched them to phone audio in seconds—keeping the flow alive.
- Time Zone Prep: Find slots that suit every region.
- Digital Stimuli: Share clickable prototypes via a link.
- Co-Host Role: Troubleshoot in real time and capture key points.
That setup not only ran smoothly but also lifted participant satisfaction by 20%.
By weaving these techniques into your next session—whether in person or online—you’ll turn discussions into actionable insights.
Analyzing Focus Group Data for Actionable Insights
You’ve got transcripts, sticky notes piled high, and a pile of screenshots. Turning that pile of raw feedback into strategic recommendations means following a clear process—and picking the right tools.
Below, you’ll see how to tag comments, map themes, compare frequencies, and build reports that product and innovation teams can actually use.
Thematic Coding And Tagging Comments
Good thematic coding means tagging each comment by sentiment, topic and intensity. Imagine testing a new app—you’d flag every mention of “ease of use” or moments of “frustration.”
- Identify core themes across transcripts, like usability or pricing concerns.
- Use spreadsheets or tools like NVivo to assign tags consistently.
- Mark up quotes with timestamps and participant demographics.
- Review tagged data in pairs to ensure reliability before synthesizing.
Tagging is just the first milestone on the road to meaningful segmentation.
Building A Theme Matrix By Demographic
A theme matrix helps you spot how themes shift by age, region or user type. You’ll see whether a pain point is widespread or limited to a particular group.
That screenshot highlights regional nuances—showing which topics spike in different markets.
| Theme | Segment A Mentions | Segment B Mentions |
|---|---|---|
| Ease of Use | 24 | 18 |
| Price Sensitivity | 15 | 22 |
| Feature Requests | 12 | 14 |
Once you have counts, comparing 3–5 groups per segment becomes straightforward.
Integrating Qualitative And Quantitative Findings
If you want more detail on stitching together groups across segments, check out Discover more insights about synthesizing multiple focus groups on Provoke Insights.
- Align top themes with survey metrics like 73% of users rating a feature as critical.
- Use affinity diagrams to cluster insights visually and reveal hidden connections.
- Cross-check qualitative trends against quantitative dashboards for validation.
Learn more about affinity diagram examples in our guide on Affinity Diagrams Examples.
With qualitative and quantitative data in sync, you’re ready to build a compelling report.
Crafting Executive Ready Reports
Your executive summary should turn pages of data into a sharp narrative that points straight to action.
- Wrap top themes in highlight boxes for quick scanning.
- Add a summary table with percentages from each group.
- Suggest precise actions—like interface tweaks or new surveys—complete with owners and deadlines.
Clear, data-driven recommendations keep stakeholders aligned and accelerate decision making.
Recommended Tools And Workflow
Selecting the right platform can cut your analysis time dramatically.
- Dedoose: Integrates qualitative and quantitative analysis features.
- ATLAS.ti: Offers network views for complex code relationships.
- Bulby: Facilitates collaborative brainstorming and Affinity Diagram creation.
Wrapping up, polish your report with visuals and a clear action plan. A concise slide deck with callouts and timelines will help you secure buy-in fast.
Best Practices You Need To Know
Consistent coding rules keep your findings sharp and fair.
- Rotate coders to cross-check themes.
- Set a minimum mention threshold, such as 5 occurrences, to focus on high-impact insights.
- Keep memos capturing unexpected observations for the next round.
- Use visuals like heat maps to show where themes cluster at a glance.
Regularly update your workflow based on feedback to keep processes efficient. Systematic analysis turns focus group feedback into a clear roadmap.
Focus Group FAQs
What Is The Ideal Focus Group Size?
You’ll want around 6–12 people. That range brings in diverse viewpoints without letting the conversation spin out of control.
How Many Sessions Should You Plan?
I usually schedule 2–3 sessions. After each round, I tweak the prompts to uncover fresh insights.
- Offer clear incentives, typically ($50–100), matching local norms.
- Line up 2–3 standbys to cover no-shows.
- Send reminders 24 hours and again 2 hours before the session.
Should You Mix Ages Or Keep Groups Homogenous?
Mixing age brackets can spark unexpected ideas. But if you’re comparing very different segments, separate sessions help everyone open up without feeling out of place.
What Incentive Strategy Boosts Engagement?
Simple cash or gift cards work best when tied to clear tasks and deadlines.
Common Mistakes To Avoid
Last-minute dropouts can derail your session. Keep an extra 20% of participants on standby—that buffer keeps the conversation flowing.
When discussions get complex, an assistant moderator is a game-changer. They’ll track side conversations and timing, while you keep the main dialogue on track.
A quick answer sheet by your side prevents awkward pauses and ensures you never lose momentum.
If one person starts to dominate, gently steer the dialogue back on course. Ask neutral follow-ups and invite quieter members to weigh in.
Always run a tech check five minutes before you start. Assign a co-host to handle any glitches so your main discussion never stalls.
Quick Reference Tips
Keep this list within arm’s reach as you prep and moderate. It’s your fast-fix guide when questions pop up.
- Export it as a PDF for offline access
- Bookmark this page for instant reference
- Pair it with your discussion guide to cover all bases
Ready to spark productive brainstorming? Get started with Bulby at Bulby